Instructions
AWARE-Light is an Android software that enables experience sampling, while also allowing researchers to collect rich sensor data simultaneously. AWARE-Light runs on Android devices, and those devices directly upload data to your MySQL server, without any intermediate servers or cloud services.
Requirements
- AWARE-Light runs on Android devices only (iOS not supported for now). Participants need to install our software package on their phones.
- You will need a MySQL server (version 5.x) that is accessible over the Internet, a database on that server, and administrator credentials. Your organisation may already manage MySQL servers, or you can opt for Amazon AWS, Microsoft Azure, or configure your own server user Docker.
Resources
- The code to run AWARE-Light is available via the Downloads page.
- The configuration page where you can define your study.
How to run a study with AWARE-Light
- Visit the AWARE-Light configuration page. There, you can enter the details for your experiment, including the questionnaires, schedule, and a specification of the sensor data you wish to capture. Once you have configured your study, you are able to download the configuration file onto your computer.
- Publish the configuration file. This file needs to be accessible by your participants. For example, you can use Dropbox or Google Drive to generate a link to the configuration file. Or you can upload this file to a website.
- Install AWARE-Light on participants’ device. Share this software with participants and ask them to install it, or you can do it yourself. The software is available for download via here.
- Load the configuration file on participants’ devices. Send your participants a link to the configuration file (from Step 2). They will then need to open the AWARE-Light application, and paste the link into it. This will show them information about the study they are about to join, and will require them to provide consent.
- Data is received by your MySQL server. The software will upload data from participants’ phones to your server. Participants can only do a small number of things with the AWARE-Light client: see which sensors are being recorded on their device, opt out of the study, force-upload their data, and selectively disable sensors (if allowed by the study configuration).
- End the study. Instruct your participants to open the AWARE-Light application, and click the button to exit the study. At this point they will no longer be uploading their data to your server.
How to configure a study
When you visit the AWARE-Light configuration page, you will be taken through a series of forms where you define the parameters of your study, such as which sensors to use, which ESM questions to ask, and where to upload the data. When you have completed the configuration, the page will offer you to download a configuration file, which will contain all your desired settings.
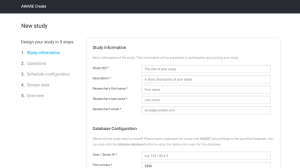
When you visit the configuration page, enter the information for your study.
- The “Study Information” data is what the participants will see when they are asked to consent to take part in the study.
- The “Database Configuration” is used by the page to initialise your database.
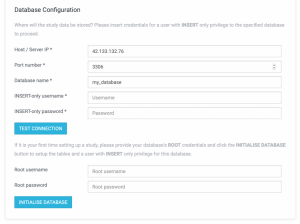
- Enter you database server’s IP address, port number, and database name. Make sure your server has SSL enabled if you want connections to the server to be encrypted.
- Enter the “INSERT-only” username and password that you would like to use. You can enter anything you want here, since the system will create these credentials.
- Enter the ROOT username and password. These should be given to you by whoever set up your database server.
- Press the “Initialise Database” button to allow the system to connect to your database and set it up.
- Press the “Test Connection” button to ensure that the setup has been completed correctly.
- NOTE: The root credentials are not permanently stored by the page.
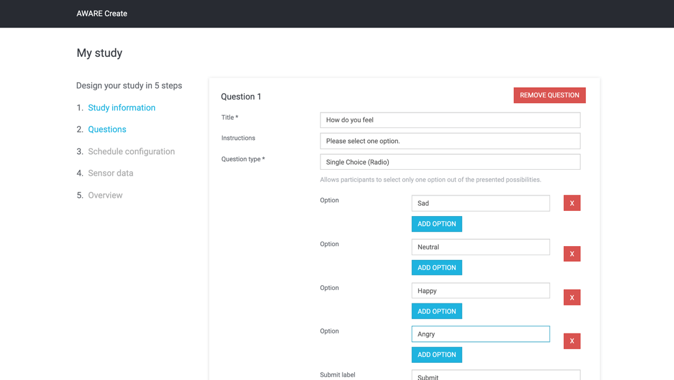
In the next step you are able to define the ESM questions that will be triggered during your study. You can create multiple independent questions. For each question, you can determine its instructions, type (e.g. single choice, multiple choice, etc), and other relevant parameters.
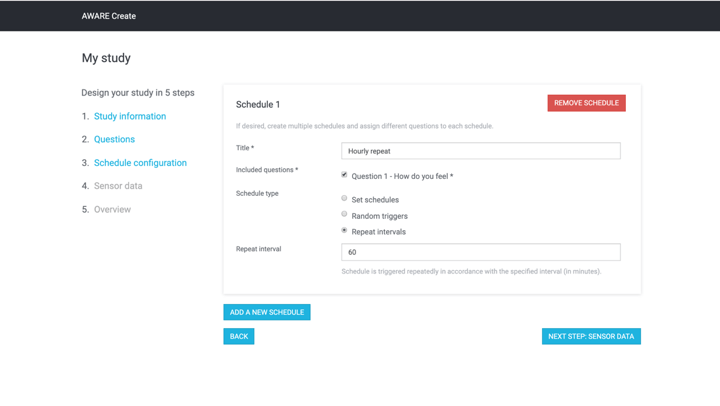
Next, you can create schedules that trigger your questions. There is a range of scheduling options. You can create multiple schedules, and each schedule can include multiple questions. Any given question can be associated to multiple schedules. The questions are triggered in the order that they appear in the schedule.
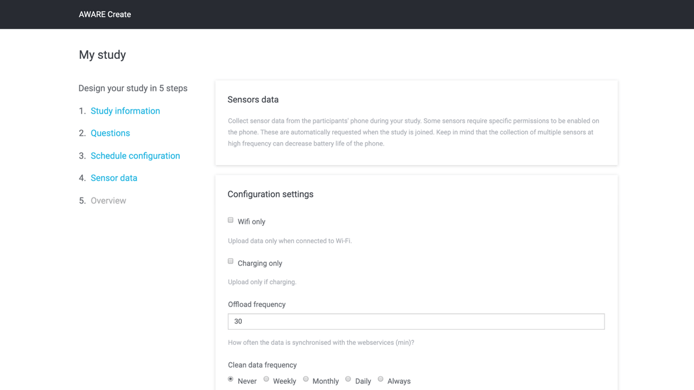
Next, you can define which sensor data will be reported by participants’ devices. You can define when & how the data is uploaded, and you can activate any sensor that is available in the list. When certain sensors are selected, there are additional parameters that need to be defined. Please read the AWARE documentation to get more details regarding the sensors and their behaviour.
There are certain important settings that you need to consider. “Offload frequency” determines the frequency at which the mobile app will try to send the collected data to the database. “Config update frequency” is the frequency at which the mobile app will try to fetch the study config to see if there is any updates to the study. “Enable settings update” allows the participants to selectively disable sensors on their phone.
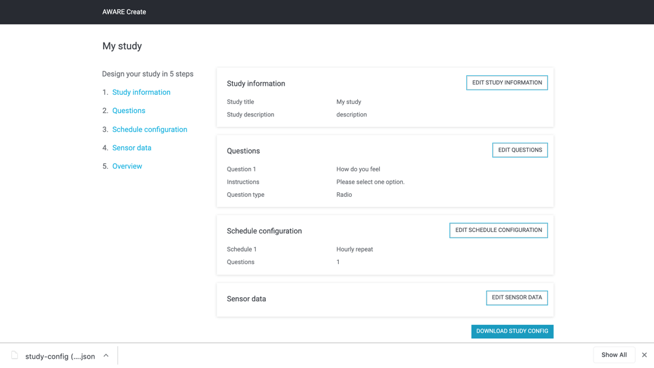
In the final step, you are able to see an overview of the configuration. Click the “Download” button to download the configuration file onto your computer. This is a file in .json format, and contains all the above configuration settings. You need to publish this file, and send a link to this file to your participants. For example, you can use Dropbox or Google Drive to generate a link to this file.
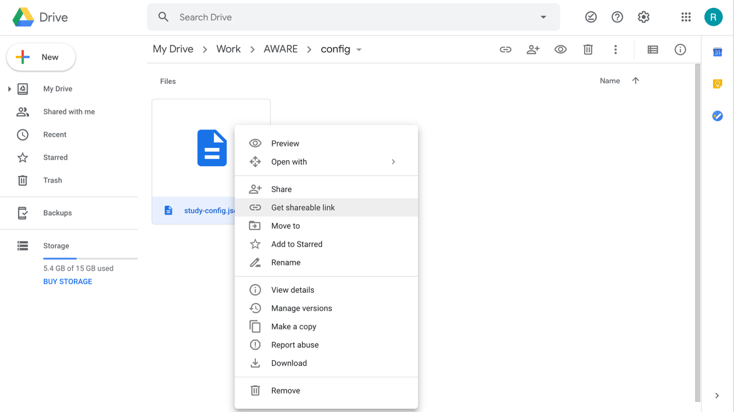
For instance, to publish the configuration file using Google Drive, you can store the file in your Google Drive directory, right-click on the file, and select “Get Shareable Link”.
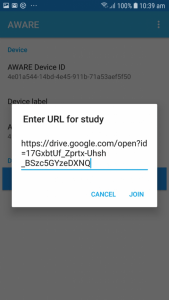
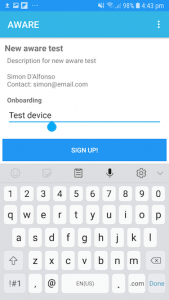
Finally, you need to send this link to your participants. They will first have to download and install AWARE-Light, and launch it. They, they will need to enter the link into the AWARE-Light app in order to join the study. Your participants need to click in the app the “Sign Up” button, and then they will be asked to provide the URL of the configuration file.
Next, your participants will be able to see the details of the study, and will also have the opportunity to provide an “onboarding” code. This can be their name, a participant code that you have given them, or any string. This string can help you disambiguate the data from all your participants. Note that even if two participants enter the same on boarding code, the underlying software will still generate a long unique ID that is used to tag all data uploaded to your server.
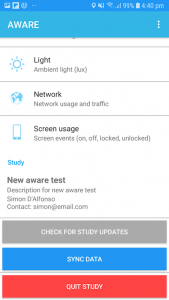
Now that your participants are onboarded and enrolled in your study, they will be able to see which sensors are being recorded, as well as quit the study. In addition, they are able to force the phone to check for an updated version of the configuration file, and force the phone to upload all collected data.
How to update an existing study
The AWARE-Light configuration page allows you to update an existing study. You will be prompted to upload your current configuration file. Once that happens, then the pages are populated with your settings, and you are able to update them as you wish, and download the updated configuration file.
It is also possible to manually edit the configuration file. For example, this can be helpful if you have made a spelling mistake. You can open the configuration file with a text editor (such as Notepad), and edit the file directly. WARNING: By doing so, it is possible that you accidentally damage the configuration file, for example if you damage the syntax of the file. Only use this approach if you know what you are doing.
Once you have a new configuration file, then you can publish it at the same URL where the previous configuration file was published. In this way, all your participants’ devices will eventually read the new configuration file and update their behaviour. If you use Dropbox or Google Drive, then please overwrite the previous configuration file with the updated configuration file.